How to Preview Midi Midi Review on Mac
five. Managing Files and Sets
Various types of files are used in making music with Live, from those containing MIDI (see 5.3) and audio (see 5.two), to more than plan-specific files such as Live Clips (come across 5.4) and Live Sets (encounter five.5). This chapter will explain everything y'all need to know about working with each of these file types in Alive. However, we should commencement take a wait at Live's browser, through which nigh files get in in the program.
5.ane Working with the Browser
Live'due south browser is the place where you interact with your library of musical assets: the core library of sounds that are installed with the program, any additional sounds you lot've installed via Ableton Packs, presets and samples you've saved, your Ableton and 3rd-party devices, and any binder on your hard drive that contains samples, tracks, etc.
The browser display is divided into left and right sections, called the sidebar and the content pane respectively. To resize the sections, drag the divider line horizontally.
v.1.1 Understanding the Browser'due south Hierarchy
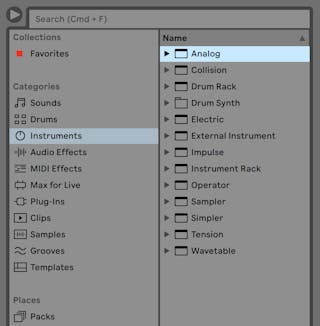
Working in the browser involves choosing i of the labels from the Collections, Categories or Places sections in the sidebar, and so selecting from the items that announced in the content pane.
The Collections labels each have their own assignable colour, which you can use to tag items (including folders) that appear in the browser'south content pane. These labels (or "tags") enable you to quickly organize and access particular browser items (for instance, your favorite or most-used items).
Y'all tin can assign Collections labels via a selected item's correct-click(Win) / CTRL-click(Mac) context menu, or past using the number fundamental shortcuts 1 through to seven. Use 0 to reset color assignments.
Annotation that Collections labels can also exist assigned to multiple browser items within a selection. Additionally, information technology is possible to assign a color label to unlike particular "types". For example, you can assign the same color characterization to a drum sound, a MIDI effect, and a plug-in.
Clicking on a Collections label in the sidebar shows all items tagged with that colour. Folders that announced in the Collections labels tin be unfolded to show their contents.
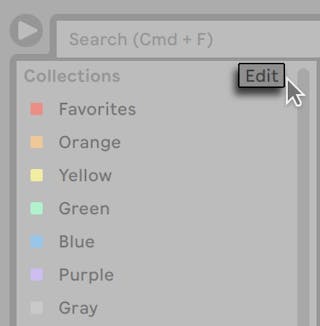
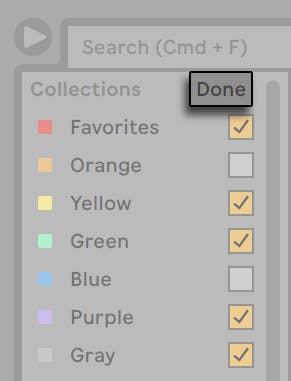
Each characterization tin be renamed via their right-click(Win) / CTRL-click(Mac) context menu, or by pressing CTRL-R(Win) / CMD-R(Mac). You tin choose which labels are visible in the browser, by clicking the Edit button side by side to the Collections header, and checking the Show/Hide Label option side by side to each label.
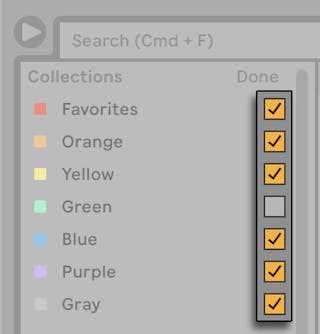
To leave Edit Mode, press the "Done" button.
Note that when a hidden unassigned colour becomes assigned to a browser particular, the Collections label for that color volition be shown in the sidebar automatically. However, visible color labels are not automatically hidden if all their assignments are removed.
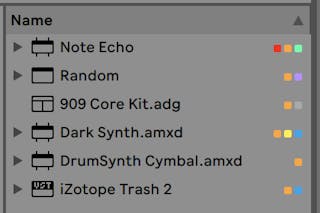
In the content pane, foursquare icons point the corresponding color(s) assigned to each item. Note that although multiple colors can exist assigned to an item, no more than than three of those colors will be shown in the content pane.
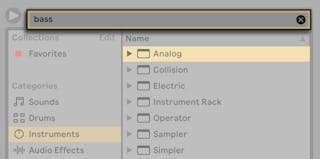
The Categories labels prove all items of a given type, regardless of where they are in your library. Use this section to explore and discover all of the instruments and sounds you lot have installed. The Categories department is organized as follows:
- Sounds — all of your Instrument Racks (run across Chapter 20) and instrument presets, organized by the type of sound they make (rather than past their devices.)
- Drums — all of your drum presets. This includes full drum kits, which are available as Pulsate Racks, besides equally single drum hits, which are delivered as Instrument Racks.
- Instruments — all of your Instrument Racks, also as "raw" Live instruments and their presets, organized by device (rather than by the type of sound.)
- Sound Furnishings — all of your Sound Effect Racks, likewise as "raw" Live sound furnishings devices and presets.
- MIDI Effects — all of your MIDI Effect Racks, also equally "raw" Live MIDI effects devices and presets.
- Max for Live — all of your Max for Live (see Affiliate 27) devices and presets, also as any Racks that are built with those devices, organized into Sound Effect, Instrument and MIDI Upshot folders.
- Plug-Ins — your third-party VST and/or Sound Units plug-ins (see nineteen.2).
- Clips — all of your Live Clips.
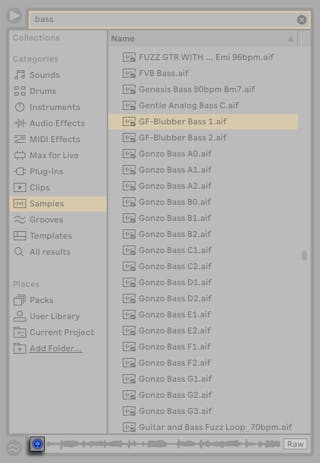
- Samples — all of your raw audio samples.
- Grooves — all of your Grooves (see Chapter 13).
- Templates — all of your template Live Sets (see v.v.iv).
- All results — this section appears after you've typed something into the search field. It shows search results for every section of the browser in a single listing.
The Places labels show the contents of folders on your hard drives. Utilize this department when you want to admission a item identify, such every bit a folder you've added or an add-on Pack. The actual contents of the Places section will vary depending on how you've configured your library, but will comprise at least the following:
- Packs — all Packs that come pre-installed with Live, too as any that you've installed yourself. Each Pack appears every bit a folder in the content pane, which can be unfolded to reveal that Pack's contents. Presets, samples, and Live Clips installed by Packs will also announced in the appropriate Categories labels. The Packs characterization too shows updates for installed Packs, equally well as additional Packs that you can install. Please refer to Downloading and Installing Packs in the Browser (see 5.1.2) for more data.
- User Library — the User Library is the default location for items yous save yourself, including default presets, grooves, your personalized Racks and device presets, your ain samples, Live Clips, etc. Files that yous relieve to your User Library will also exist available in the advisable Categories labels.
- Current Project — all of the files that are contained in the currently active Project (see 5.half-dozen). If you're working on a Live Prepare that you haven't still saved, the current Project refers to a temporary location.
- any folders from any of your difficult drives that yous've added to Live'southward Browser.
Moving through the files in Live'south browser can exist done with either the mouse or the computer keyboard:
- Scroll upwardly and down in the Browser with the upwardly and down arrow keys, the mousewheel, or by clicking and dragging while holding the CTRL-ALT(Win) / CMD-ALT(Mac) modifier.
- Close and open folders, or move betwixt the sidebar and content pane with the left and right arrow keys.
By default, any previously open folders will close when you open up a new ane, just you can override this behavior by property CTRL(Win) / CMD(Mac) while opening new folders.
5.1.2 Downloading and Installing Packs in the Browser
The Packs label in the browser shows yous all Packs that come pre-installed with Live, as well every bit any that yous've installed yourself.
To bank check for existing updates for your installed Packs, navigate to the Packs label and expand the Updates section.
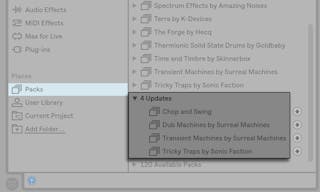
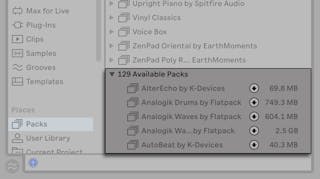
You tin can also view Packs that you ain, but have not installed. These uninstalled Packs announced in the Available Packs section inside the Packs label.
Yous tin download whatever of these Updates or Bachelor Packs past pressing the download icon adjacent to it.
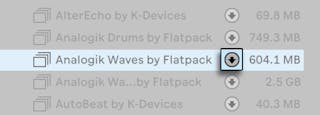
While the Pack is downloading, the download icon changes to a break icon that indicates the progress of the Pack'south download.
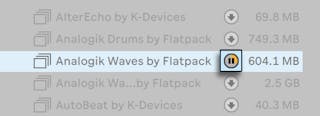
Should y'all need to, you can pause downloads and resume them at a later point. To suspension a download, press the pause icon. When a download is paused, the paused icon changes back to a download icon.
To resume a paused download, printing the download icon again.
(Note: you tin can download multiple selected Packs at the same time. Y'all can also break and resume downloading multiple selected Packs.)
When the download is complete, you can install the Pack past pressing the Install button.
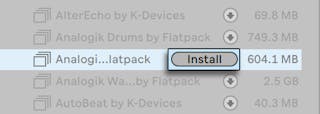
Upon pressing the Install push, Live will display a progress bar that indicates the status of the process.
Annotation that you tin download a Pack, intermission, resume or abolish a download, or install a Pack past choosing the appropriate control in that Pack'due south right-click(Win) / CTRL-click(Mac) context menu.
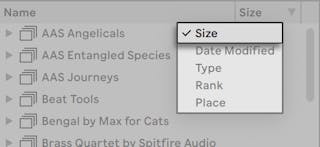
Sometimes you lot might demand to know the size of a Pack before yous download and install it. For example, you may have limited space on your hard drive. Y'all tin can configure the browser to show the size of all Packs that appear in the Updates and Bachelor Packs sections. To practise this, right-click(Win) / CTRL-click(Mac) on the Proper name header in the browser's content pane and choose the Size choice in the context carte du jour.
Yous can delete an installed Pack via its correct-click(Win) / CTRL-click(Mac) context carte du jour. Notation that deleted Packs volition appear in your list of Bachelor Packs.
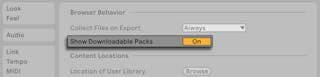
It is possible to configure Live's Preferences to evidence or hide Updates and Available Packs in the browser. To do this, press the Show Downloadable Packs toggle in the Library Preferences.
5.1.three User Folders
Live's browser allows you to work with your creative tools regardless of where they are installed on your computer. This allows y'all to, for example, store large sample collections on ane or more external drives, and all the same use the browser to access their contents - there is no need to keep them in a single centralized location.
In club to work with your own folders in Live, yous must commencement add together them to the browser, either by dropping them straight into Live from the Explorer (Windows)/Finder (Mac) or by pressing the Add Binder button in the browser's sidebar.
Afterward adding a user folder, Live will scan it, which "teaches" the browser near its contents. Following this, it will appear in the Places section of the sidebar.
Annotation: adding a user folder does not actually motility the folder to a new location, merely but makes it available in Live'south browser. If you reorganize your drives using Explorer (Windows)/Finder (Mac), Alive may not be able to find user folders if they've been moved. For instance, if a user folder is contained on an external hard bulldoze, and Alive is opened without the drive attached, the user binder will still appear in the browser merely volition be grayed out. You lot can attempt to discover information technology past using the correct-click(Win) / CTRL-click(Mac) context menu'due south Locate Folder control, or tell Live to "forget" this folder via the Remove from Sidebar command. You can also use this command to remove folders that aren't missing, only which y'all simply don't want to piece of work with anymore.
5.1.4 Searching for Files
Alive'due south browser is equipped with a search field that filters the contents of the selected sidebar label as y'all type. To search across all locations, printing CTRL-F(Win) / CMD-F(Mac).
The results will include files that friction match all search terms, as opposed to any. For example, if you search for "audio-visual bass," the search will yield all acoustic bass sounds — non all acoustic sounds and all bass sounds.
For mouse-free searching, we suggest the post-obit sequence of shortcuts:
- CTRL-F(Win) / CMD-F(Mac) to identify a cursor in the search field;
- Type your search terms;
- Down arrow fundamental to jump to the search results;
- Up and downwardly arrow keys to scroll the search results;
- ESC to clear the search field, showing all of the contents of the selected sidebar label.
Live allows yous to preview samples, clips, and musical instrument presets in the browser before they are imported into the program. To enable previewing, activate the Preview switch adjacent to the Preview Tab at the bottom of the browser.
Hint: You tin can preview files even when the Preview switch is not activated by pressing Shift-Enter or the correct arrow key.
Click on a file (or use the up and down arrow keys) to select information technology. Click in the Tab's scrub area to make playback jump to that point. (Note that it is not possible to scrub clips that have been saved with Warp turned off.)
You lot tin select Live Clips in the browser to load them into the Preview Tab.
You can likewise preview Live's instrument presets in the Preview Tab. When selected, y'all'll hear a short sound example of the preset, and then you lot tin get an idea of how it sounds before loading it.
With the Raw push enabled, files will preview at their original tempo and will not loop. With Raw disabled, Live will try to preview files in sync with the current Prepare, and then that you can better gauge which samples will piece of work for you. Delight notation that scrubbing is non possible when Raw is enabled.
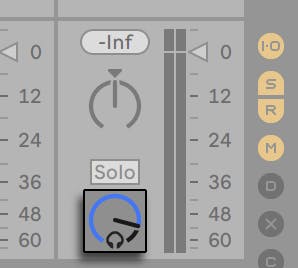
The previewing book tin can be adapted using the mixer's Preview Book knob.
If your audio hardware offers multiple sound outs, you tin privately audition, or cue, files via headphones connected to a separate pair of outs — while the music continues to play. To larn how to gear up upwardly Live for cueing, please refer to the relevant section (see 16.six) of the Mixing chapter.
There are several ways to add clips to a Alive Set up:
- Files can be dragged and dropped from the browser into tracks in the Session or Arrangement View. Dragging and dropping material from the browser into the space to the right of Session View tracks or beneath System View tracks will create a new track and place the new prune(south) there.
- In the Session View, double-clicking or pressing Enter on a file in the browser will automatically create a new track to the right of the other tracks and load information technology with the clip.
- Files can be dropped directly into Live from the Explorer (Windows)/Finder (Mac).
In addition to the drag-and-driblet method of loading files from the browser, Live offers a Hot-Swap Style to reduce your mouse travel. Hot-Swap Mode tin can be toggled on and off with the Q key, and establishes a temporary link between the browser and, for example, a virtual musical instrument. While in Hot-Swap Way, you tin step through samples or presets to audience them "in identify," that is, within the musical instrument. Hot-swapping for presets is covered in the Alive Device Presets section (see xix.one.1). Let's go through an example of hot-swapping samples:
Live's born Impulse instrument features eight sample-thespian slots that can be filled by dropping samples into them. Alternatively, we tin can click the Hot-Bandy button that appears as we move the mouse over a slot.

Clicking the Hot-Swap button or pressing the Q key engages Hot-Swap Mode:
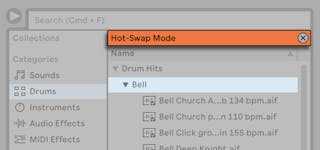
While in Hot-Bandy Mode, pressing the up or downwards arrow primal moves to the side by side file in the content pane, and pressing Enter or double-clicking the file loads information technology into the Impulse slot (presumably while Impulse is playing incoming MIDI notes). The link between the browser and the musical instrument will be cleaved if a unlike view is selected, or if the Q cardinal or the Hot-Swap push is pressed once more. Hot-swapping tin can besides be cancelled with a press of the ESC key or by pressing the close button in the Hot-Bandy bar at the top of the browser.
When Hot-Swap Style is re-entered, the browser will evidence the location of the currently loaded audio and pre-select it.
5.ii Sample Files
A sample is a file that contains sound data. Live tin can play both uncompressed file formats (WAV, AIF and Sound Designer II for Mac) and compressed file formats (MP3, AAC, Ogg Vorbis, Ogg FLAC and FLAC). (Please annotation that not all of these file formats can be played in the Lite Edition.)
A note on using Variable Chip Charge per unit (VBR) files: Please install QuickTime for decoding purposes if you do non already take it on your organization. It tin exist downloaded from the Apple website*http://www.apple.com/quicktime/download.
Every bit Live plays the samples directly from disk, you can work with a big number of (large) samples without running into RAM memory limitations. Please note, however, that you may encounter disk throughput problems if your deejay is near total, and/or (on Windows systems) highly fragmented. Difficult drive rotation speed can also affect disk performance. Refer to the department on managing the disk load (see 33.2) for more information.
Live can combine uncompressed mono or stereo samples of any length, sample rate or chip depth without prior conversion. To play a compressed sample, Live decodes the sample and writes the event to a temporary, uncompressed sample file. This ordinarily happens speedily enough that you will be able to play the sample right away, without waiting for the decoding process to finish.
Note: When adding a long sample to a projection, Live might tell you lot that it cannot play the sample before it has been analyzed. Please see the section on analysis (see five.2.2) for an explanation.
5.two.1 The Decoding Cache
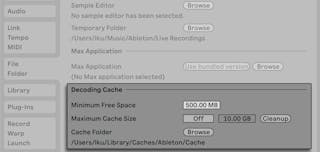
To save computational resources, Alive keeps the decoded sample files of compressed samples in the cache. Maintenance of the cache is normally not required, as Live automatically deletes older files to make room for those that are new. You can, notwithstanding, impose limits on the cache size using the File/Folder Preferences' Decoding Cache section. The cache volition not abound larger than the Maximum Cache Size setting, and it will always leave the Minimum Gratuitous Infinite on the hard disk drive. Pressing the nearby Cleanup button will delete all files not being used past the electric current Live Set.
5.2.2 Analysis Files (.asd)
An analysis file is a lilliputian file that Live creates when a sample file is brought into the program for the commencement fourth dimension. The assay file contains data gathered by Live to help optimize the stretching quality, speed up the waveform display and automatically detect the tempo of long samples (run across 9.2.3).
When adding a long sample to a project, Live might tell you that it cannot play the sample before it has been analyzed. This will not happen if the sample has already been analyzed (i.e., Live finds an analysis file for this sample), or if the Tape/Warp/Launch Preferences' Automobile-Warp Long Samples preference (see 9.2) has been deactivated.
An analysis file can too shop default clip settings for the sample:
Clicking the Prune View'southward Salve button (see 8.i.eight) will store the current prune'south settings with the sample's assay file. The adjacent fourth dimension the sample is dragged into Live, it volition appear with all its prune settings intact. This is specially useful for retaining Warp Marker settings with the sample. Storing default clip settings with the analysis file is different from saving the clip every bit a Live Clip.
While analysis files are a handy way to shop default information about a particular sample's settings, keep in mind that yous tin can use different settings for each clip inside a Live Set — even if those clips refer to the aforementioned sample on disk. But if you drag a new version of the sample into a Alive Set, Live will use the settings stored in the assay file for the newly created clip.
The analysis file's name is the same as that of the associated sample, with an added ".asd" extension. Live puts this analysis file in the same folder as the sample.
 Samples that have an
 .asd file are displayed similar this in the browser.
 Samples without an
 .asd file expect like this.
The analysis files themselves do non appear in Live'southward browser.
Annotation that yous can suppress the cosmos of .asd files by turning off the Create Analysis Files option in the File/Binder Preferences. All data (except for the default prune settings) tin be recreated by Live if the .asd file is missing, nonetheless this will take some time for longer samples.
5.ii.three Exporting Audio and Video
The File menu's Export Sound/Video command allows you to export Live'due south audio output as new samples. The resulting files tin be used to burn an audio CD for listening purposes or a data CD, which could serve every bit a fill-in of your work or be used with other digital audio applications. If your set includes video, yous can also utilise the Export Audio/Video command to export this to a new video file, which will be created in the aforementioned directory as the rendered audio files. (Note: video export is not available in the Calorie-free and Intro Editions.) You can also upload your exported audio files directly to your SoundCloud account.
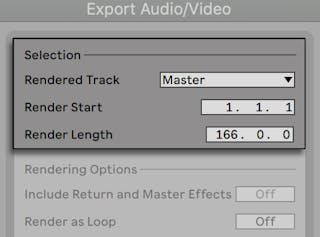
The Export dialog'due south Rendered Track chooser offers several options for which audio point to return:

- Main — the post-fader signal at Live's Main output. If you are monitoring the Master output, y'all tin be sure that the rendered file will contain exactly what you lot hear.
- All Private Tracks — the mail service-fader signal at the output of each individual track, including render tracks and MIDI tracks with instruments. Live will create a split up sample for each track. All samples will take the same length, making it piece of cake to align them in other multitrack programs.
- Selected Tracks Only — this is identical to the All Individual Tracks option, just only renders tracks that were selected prior to opening the Export dialog.
- (single tracks) — the post-fader signal at the output of the selected runway.
The other Selection fields make up one's mind the start time and length of the exported textile:
- Render Beginning — sets the position at which rendering will begin.
- Render Length — determines the length of the rendered sample.
Tip — a fast way to ready both the Render Start and Length values is to select a range of time in the Arrangement View prior to invoking the Export Audio/Video command. But remember — a rendered audio file contains only what y'all heard prior to rendering. Then, for instance, if you lot're playing back some combination of Session View clips and Arrangement material, then that is what will exist captured in your rendered file — regardless of which view is active when y'all render.
The Export dialog offers several audio rendering options:
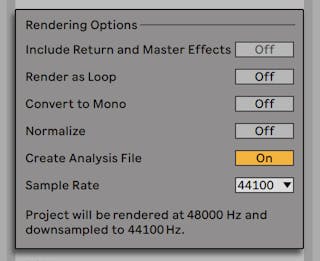
- Include Return and Primary Effects – If this is activated, Live will individually render each selected runway with any return tracks used by that track, also equally effects used in the Chief track. This is especially useful when rendering material for a live functioning, or when providing stems to a mixing engineer or remix artist.
- Render every bit Loop — If this is activated, Live volition create a sample that can exist used as a loop. For example, suppose your Alive Set uses a delay effect. If Return equally Loop is on, Live will go through the rendering procedure twice: The first pass will not actually write samples to disk, but add the specified delay outcome. Every bit the second laissez passer starts writing audio to deejay, it will include the filibuster "tail" resulting from the first pass.
- Convert to Mono — If this is activated, Live will create a mono file instead of a stereo file.
- Normalize — If this is activated, the sample resulting from the render procedure volition exist normalized (i.e., the file volition be amplified and then that the highest elevation attains the maximum available headroom).
- Create Analysis File — If this is activated, Live will create an
.asdfile that contains analysis information about the rendered sample. If you intend to utilise the new sample in Live, check this option. - Sample Rate — Annotation that your choice of sample rate works every bit follows: if yous select a sample charge per unit equal to or higher than the rate you're using in your project (as set in the Audio tab of Live's Preferences), Alive will export in a single step, at the sample rate you've chosen in the Consign dialog. If you export at a sample charge per unit that is lower than your current project sample rate, Live will showtime consign at the electric current projection sample rate and then downsample the file in a 2nd footstep using a high-quality process. Note that this may accept a few moments.
- Upload Audio to SoundCloud — If activated, a helper application will launch that volition permit you to upload your exported sound file to SoundCloud.
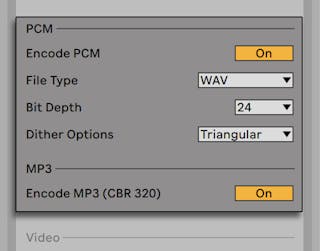
- Encode PCM — If activated, a lossless audio file is created.
- File Type — WAV, AIFF, and FLAC formats are available for PCM export.
- Scrap Depth, Dither Options — If you are rendering at a fleck depth lower than 32-chip, choose one of the dither modes. Dithering adds a small amount of noise to rendered audio, but minimizes artifacts when reducing the bit depth. By default, Triangular is selected, which is the "safest" mode to use if in that location is any possibility of doing additional processing on your file. Rectangular manner introduces an even smaller amount of dither noise, only at the expense of additional quantization error. The three Pow-r modes offer successively higher amounts of dithering, but with the noise pushed higher up the audible range. Note that dithering is a procedure that should only exist applied once to any given audio file. If you plan to do further processing on your rendered file, it's best to return to 32-scrap to avert the need for dithering at this phase. In particular, the Pow-r modes should never be used for any material that will exist sent on to a further mastering stage — these are for final output simply. (Delight note that the Prisoner of war-r modes are not bachelor in the Intro and Lite Editions.)
- Encode MP3 — If activated, a CBR 320 kbps MP3 file is created. It is possible to export PCM and MP3 simultaneously. If neither toggle is enabled, the Consign button will be disabled.
(Note: video rendering is not available in the Intro and Light Editions.)
In addition to settings for sound rendering, the Consign dialog provides additional options for rendering video:
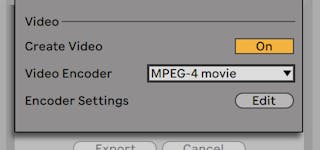
- Create Video — If this is activated, a video file will be created in the aforementioned directory as your rendered audio. Note that this option is simply enabled if yous accept video clips in the Organisation View. Besides, information technology is non possible to only render a video file — enabling video rendering will always produce a video in addition to rendered audio.
- Video Encoder — This chooser allows you to select the encoder to use for the video rendering. The choices you have hither depend on the encoders you lot take installed.
- Video Encoder Settings — This button opens the settings window for the selected encoder. Annotation that the settings options will vary depending on the encoder you have chosen. Sure encoders accept no user-configurable options. In this case, the Edit button will exist disabled.
One time yous've fabricated your selections and clicked Consign to begin the rendering process, audio rendering will begin. Later on the sound rendering is complete, the video will be rendered. Note that, depending on the encoder used, video rendering may occur in more than than one laissez passer. Live will display a progress bar that will indicate the status of the process.
Unless you've specified a special window size or attribute ratio in the encoder settings, the rendered video file will play back exactly as it appeared during real time playback in Live. The video file volition also contain the rendered audio.
For more than information about working with video in Live, encounter the chapter on video (see Affiliate 23).
Normally, rendering happens as an offline process. Simply if your gear up contains an External Sound Effect (encounter 24.18) or External Instrument (come across 26.4) that routes to a hardware effects device or synthesizer, the rendering process is a bit different. In this case, rendering the master output happens in existent fourth dimension. If you render unmarried tracks, all tracks that don't route to an external device anywhere in their signal paths volition be rendered offline. And then, any tracks that do access these devices will be rendered in real time. Live will automatically trace each rail'southward signal flow and detect if real-time rendering is necessary. You'll so be presented with several options when you lot start to render:

Waiting for External Devices to Go Silent.
- Skip — By default, Alive will wait for ten seconds before starting a existent-time render. This should allow any audio from external devices to fade out, but if you need more time (for example, if you're waiting for a long reverb tail), you can increase the wait time past typing a new number in the number box. On the other hand, if you're sure that your external devices aren't making whatever audio, you can speed the process along by pressing "Skip," which will start the render immediately.
Afterwards the render has begun, the dialog changes to show a recording progress bar:
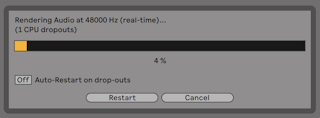
- Motorcar-Restart on drop-outs — Rendering in real-time requires somewhat more CPU power than non-real-time rendering, and in some cases drop-outs (small gaps or glitches in the audio) can occur. Alive detects when drop-outs happen, and rendering will start once again from the beginning if the Auto-Restart option is enabled.
- Restart — manually restarts the rendering process.
- Abolish — stops the rendering process and deletes the partially rendered file.
The number of rendering attempts (if there has been more than one) will also exist listed in the dialog box. If you observe that dropouts and restarts keep happening, you should close other running applications to permit more processing power for rendering. Please see the chapter on computer audio resource (see Chapter 33) for more tips on improving performance.
5.three MIDI Files
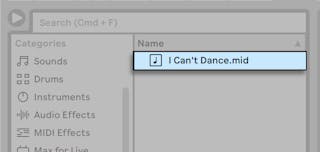
A MIDI file contains commands that prompt MIDI compatible synthesizers or instruments, such as Alive's Simpler, to create specific musical output. MIDI files are exported by hardware and software MIDI sequencers. Importing MIDI files into Live works differently than with samples: MIDI file data is incorporated into the Live Set, and the resulting MIDI clips lose all reference to the original file. MIDI files appear with a special icon in the browser.
Y'all can import MIDI files by using the browser or the Create menu's Import MIDI File... control. Note that when using the Import MIDI File... command in the Arrangement View, the file will exist inserted at the Insert Marker position. When using the command in the Session View, the file volition be inserted in the currently selected clip slot.
five.3.ane Exporting MIDI Files
Live MIDI clips tin can be exported as Standard MIDI files. To consign a MIDI clip, utilise the File card'south Consign MIDI Clip control. This control will open a file-salve dialog, allowing you to choose the location for your new MIDI file.
Exporting a MIDI file is dissimilar from saving the clip every bit a Live Prune.
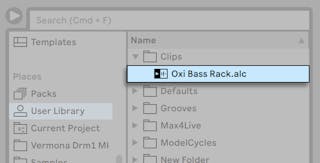
5.4 Live Clips
Private sound or MIDI clips can be exported to disk in the Live Clip format for easy retrieval and reuse in any project. Audio clips only contain references to samples on disk (rather than the audio data itself), so they are very small, which makes it piece of cake to develop and maintain your own drove.
To salve a clip from the open Live Set to disk, simply drag it to the Places section of the browser and drop it into the Current Project or any user folder. For audio clips, Live will manage the copying of the clip's sample into this new location based on the option in the Collect Files on Export chooser (meet 5.8.ane). You tin so type in a new name for the clip or confirm the one suggested by Live with Enter.
Live Clips are a cracking way of storing your ideas for after use or development, every bit they save not only the original clip, including all its clip and envelope settings, but also the original track'due south devices. In order to recreate a Live Clip's device chain, either elevate it into a rails containing no clips or devices, or drag it into the space in the Session or Arrangement View containing no tracks. Note that Live Clips that are imported into tracks already containing devices or clips will appear with their clip settings but not their devices. Y'all could, for instance, drop a bassline Live Clip on an existing rail that drives a bass musical instrument, rather than creating a new runway.
Clips belonging to whatsoever Alive Sets already on deejay are also Live Clips. Please see the section on merging Sets (see 5.v.2) for more on this topic.
Notation that storing default clip settings with a sample's analysis file is different from saving a Alive Clip. The default clip in the .asd file annotates the sample with sensible default values (warp, gain and pitch settings) so that information technology will play in a defined way when it is added to a set. Live Clips, on the other mitt, are stored on disk as split up musical ideas. For example, you lot could create a number of variations from the aforementioned audio clip by using different warp, pitch, envelope and result settings, and store them all every bit split up Live Clips. In the browser, yous could then independently sort and preview these clips, fifty-fifty though they are all referring to the same source sample.
five.5 Live Sets
The type of document that yous create and piece of work on in Live is chosen a Live Fix. Think of this equally a unmarried "song." Sets must exist saved inside projects, so that Live can proceed track of and manage all of the various components of the Live Set: Live Clips, device presets, any samples used, etc.
v.five.ane Creating, Opening and Saving Sets
Use the File menu's New Live Ready command to create new Alive Sets, and the Open Live Set or Open Contempo Set command to open existing ones. In the browser, y'all tin double-click or printing Enter on a Live Fix to open it.
The File menu'due south Save Live Set command saves the current Live Fix exactly as information technology is, including all clips and settings.
You can employ the Save Alive Set Every bit command to save the current Live Fix under a different proper noun and/or in a different directory location, or the Relieve a Copy control to create a copy of the current Live Gear up with a new proper noun and/or new directory location.
5.5.2 Merging Sets
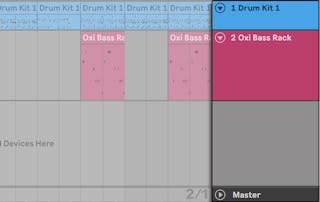
Live makes information technology easy to merge sets, which tin come in handy when combining work from unlike versions or pieces. To add all tracks (except the return tracks) from one Alive Set into some other, elevate the prepare from the browser into the current set, and drop it onto any track title bar or into the drop area next to or below the tracks. The tracks from the dropped ready volition exist completely reconstructed, including their clips in the Session and Arrangement View, their devices, and their automation.

If y'all adopt to import individual tracks from a set, you lot can unfold the Live Set in the browser just every bit if it were a binder.
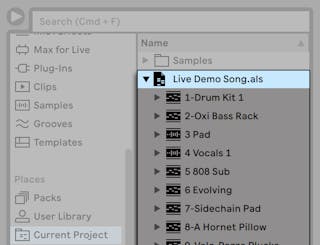
You can at present drag the individual tracks and drib them as described at the beginning of this section. Any grooves (see Chapter 13) that were saved with your set up are also available as a binder inside the unfolded Set.
If you only want the device chain (e.thou., a device and its audio or MIDI effects) from some other fix, y'all can drag in the Devices icon from the gear up in the browser.

You can also elevate Grouping Tracks (encounter 16.3) and nested Group Tracks from Live's browser. Group Tracks can be expanded in the browser, allowing you to load an individual track from within.
In addition to unfolding sets, yous can further unfold the tracks inside the sets to access the private Session View clips that were used on the track:
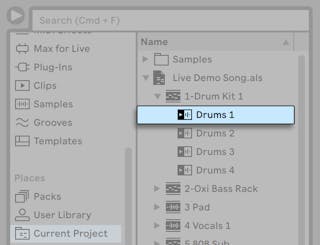
Y'all can scan, preview and import Session View clips from the fix as if they had been stored as individual Live Clips. This ways that whatever Live Gear up can serve every bit a pool of sounds for whatever other, suggesting creative reuse and crossover.
five.v.3 Exporting Session Clips as New Sets
You can export a pick of Session View clips as a new Live Set by dragging them to the browser. To consign a ready, first click and drag, or use the Shift or CTRL(Win) / ALT(Mac) modifiers, to select more one Session View clip. Then, only drag and drop the clips into the Electric current Project or whatever user folder, where you tin either confirm Live's suggested name or type in 1 of your own.
5.v.4 Template Sets
Use the File carte du jour'southward Save Live Set As Default Ready... command to save the current Alive Prepare as the default template. Live will use these settings as the initialized, default land for new Live Sets. You tin can use this to pre-configure:
- Your multichannel input/output setup.
- Preset devices, like EQs and Compressors, in every track.
- Reckoner central mappings (come across 29.2.five).
- MIDI mappings (come across 29.1).
Note that whatsoever Live Set in Live'south browser tin be set as the default Live Set via the Gear up Default Live Gear up context card entry.
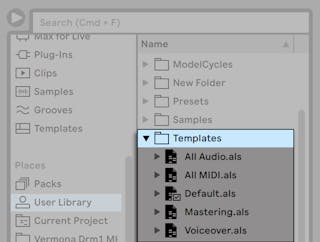
In addition to this "chief" default template, you can create additional template sets for different types of projects, each with their ain unique configuration of tracks, devices, etc. To do this, save the current Live Set using the File carte's Save Live Gear up As Template... control. Any sets saved as a template will appear in the browser's Templates category and the Templates folder in the User Library. (Note that the User Library's Templates binder is automatically created the first time a template Set is saved.) These sets will then office equally templates: they will load with the configuration yous saved, but with the proper noun Untitled.als, ready to be used as a new set.
5.5.five Viewing and Changing a Live Fix's File References
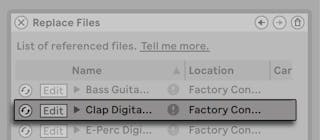
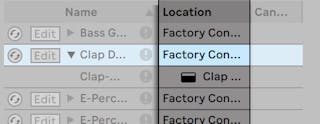
To view a list of the files referenced by the electric current Live Set, cull the Manage Files command from the File menu, click the Manage Gear up button, and so click the View Files button. Live will display one line for each file used by the Alive Set. To list all clips or instruments in the Live Fix where the file is really used, click the triangle to expand the line. Here is what you can do:
- Replace a file — Dragging a file from the browser and dropping it on an entry in the list makes the Live Set reference the new file instead of the onetime ane. For samples used in sound clips, Alive retains the clip backdrop; the Warp Markers are kept if the new sample has the same or a greater length as the quondam sample and discarded otherwise. Please annotation that replacing a sample will modify all clips in your set that reference this sample.
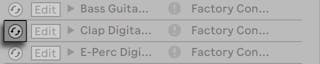
- Hot-swap files — Using the Hot-Swap button at the left-mitt side of each entry, you can quickly scan through alternatives for the file that is currently being referenced. This is like dragging files hither, only quicker.
- Edit a referenced sample — using an external application (which can be chosen in the Preferences' File/Binder tab). Clicking the Edit button will open the referenced sample in the external application. The sample will remain offline as long as the Edit switch is engaged. For samples used in audio clips, the electric current gear up of Warp Markers is retained only if the sample length remains the same every bit before. Annotation that the Edit push is merely bachelor for samples, not for other types of files such as Max for Live devices (meet Chapter 27).

- View a file's location — The Location cavalcade states if a file is missing (see 5.seven), or if it resides in your User Library, a Project or somewhere else ("external"). When unfolded, the entry shows the specific places in the Fix where the file is used.
5.half-dozen Live Projects
A Live Projection is a folder containing Alive-related files that belong together. Consider, for example, work on a piece of music: Y'all start out with an empty Live Set; you record audio and thereby create new sample files; yous drag in samples from collections; you save unlike versions of the Live Set along the fashion so that yous can go back and compare. Perhaps you too save Alive Clips or device presets that "belong" to this particular musical piece. The projection folder for this Live Project volition maintain all the files related to this piece of music — and Alive'due south File Manager will provide the tools you need to manage them (run across v.6.3).
5.6.1 Projects and Alive Sets
When you save a Alive Ready under a new proper name or in a new folder location, Live volition create a new projection folder and store the Live Fix there — unless you lot are saving the Live Set into an existing Alive Project. Allow'southward look at an instance to illustrate this process:
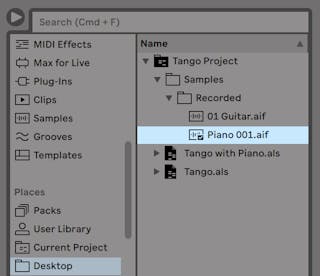
We accept recorded some audio into a new Live Prepare. We at present save the Live Prepare nether the proper noun "Tango" on the Desktop. The Desktop is bachelor in the browser considering we have previously added information technology every bit a user binder. Here is the result as displayed by the Live browser:
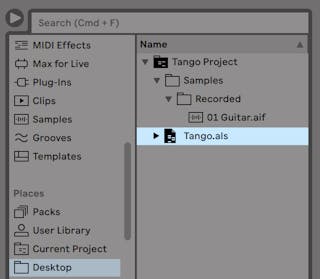
The project folder ("Tango Project") contains the Live Fix ("Tango.als") and a Samples folder, which in turn contains a Recorded binder with ii samples in information technology. Notation that the current Projection is too indicated in the title bar of Live'due south application window.
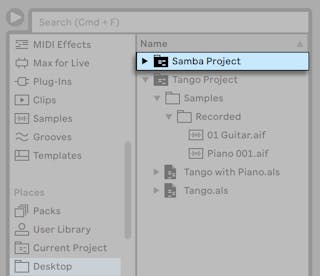
Next, nosotros tape another rails into our Projection. We save the modified version of the Live Set under a new name so that we do not lose the previous version. Accepting the Save As command'south default proffer, we store the new version of the song in the Tango Project folder.
The Tango Project now contains two Alive Sets, and its Samples/Recorded binder contains the samples used by both of them.
And now for something completely different: We choose the File menu's New Alive Set up command and record a samba tune. Equally this has zip to do with our tango dabblings, we decide to save information technology outside the Tango Project folder, say on the Desktop. Alive creates a new project folder named Samba Project next to Tango Project.
So far we have seen how to create Alive Projects and save versions of Alive Sets into them. How do we open a Project? Only past opening any of its independent Live Sets. Double-clicking "Tango with Piano.als" opens that Set and the associated Project — as displayed in Live'southward title bar.
Allow'southward suppose that, in the form of our piece of work on "Tango with Piano.als," we become sidetracked: The piece evolves towards something entirely different, and we feel that information technology should live in a Project of its own. Then, we "Relieve Equally..." under a new name and in some location outside the current Project, say the Desktop:
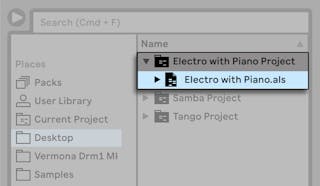
Note that the new projection folder has no Samples folder (notwithstanding). "Electro with Piano.als" is still referencing the piano sample from the original Tango Projection. At that place is cypher wrong with this except for when the Tango Projection is moved away or deleted; and so "Electro with Piano.als" will exist missing samples. Y'all can prevent this past collecting external files (see 5.viii). Fifty-fifty after the fact, Alive's tools for searching missing files (see 5.7) can help solve this problem.
There is actually no need to continue a Projection's Alive Set exactly i level beneath the Projection itself. Within a project folder, you can create any number of sub-folders and motion files effectually to organize them as desired, although you many need to use the File Manager to "teach" the Project about the changes you've made (meet v.12.2).
In general, Alive will practice what it can to prevent situations such as orphaned (Projection-less) Live Sets, which accept the potential of confusing both the user and Alive's file management tools. It cannot, however, control situations in which Sets or files are moved out of lodge and get disorganized via the Explorer (Windows)/Finder (Mac).
A annotation for users of older Live versions: Live does non allow overwriting Alive Sets that were created by older major versions to preclude compatibility problems. Instead, you will exist requested to "Save As...". Doing this volition insure that the newly saved Live Sets reside in projection folders.
five.6.2 Projects and Presets
By default, new instrument and outcome presets are stored in your current Projection. At times nonetheless, it may make more sense to save a preset to another folder or to your User Library, so that you can access them from other Projects. You can drag a preset between folders later on saving information technology (see 19.i.ane), or merely drag the championship bar of the device over a folder in the sidebar, wait for the content pane to open, and then drop it into the content pane, adding it to the binder.
When saving presets that contain samples to a new location, Alive may copy the samples depending on the settings in the Collect Files on Export chooser in the Library Preferences. You can then type in a new proper noun for the device or confirm the one suggested by Live with Enter.
five.half-dozen.3 Managing Files in a Project
Live's File Manager offers several convenient tools for managing Projects. In one case you've opened a Live Set that is function of the Project you lot wish to manage, choose the Manage Files control from the File menu, and then click the Manage Project push button. The File Manager will nowadays you with an overview of the Project's contents and tools for:
- locating files that the Projection is missing;
- collecting external files into the Project (see 5.viii) ;
- listing unused files in the Project (see 5.10) ;
- packing a Project in Pack format (see 5.11) ;
five.7 Locating Missing Files
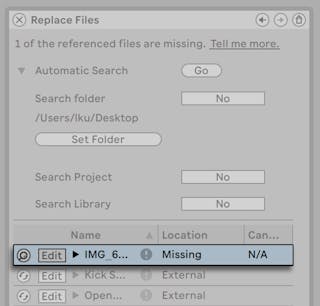
If you lot load a Live Set, Live Clip or preset that references files which are missing from their referenced locations, Live's Status Bar (located at the lesser of the main screen) volition display a warning message. Clips and musical instrument sample slots that reference missing samples volition announced marked "Offline," and Live will play silence instead of the missing samples.
Live's File Director offers tools for repairing these missing links. Click on the Status Bar message to access these. (This is really a shortcut for choosing the Manage Files command from the File card, clicking the Manage Prepare push, and then clicking the Locate push button found in the Missing Files department.) The File Director volition present you with a list of the missing files and associated controls.
5.7.1 Manual Repair
To manually fix a broken file reference, locate the missing file in the browser, drag it over to the File Managing director and drop it on the respective line in the list of missing files. Note that Live will not care if the file y'all offer is really the file that was missing.
5.7.2 Automatic Repair
Live offers a convenient automated search function for repairing file references. To send Alive on a search, click the Automated Search department's Go button. To reveal detailed options for guiding the automatic search role, click the neighboring triangular-shaped push.
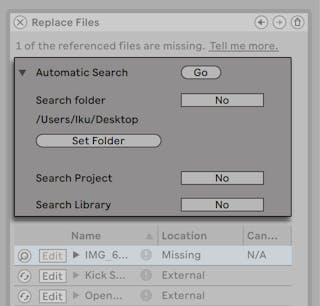
- Search Folder — includes a user-defined folder, equally well as whatsoever sub-folders, in the search. To select the binder, click the associated Fix Folder push button.
- Search Project — includes this Prepare's project folder in the search.
- Search Library — includes the Live Library in the search.
For each missing file, the automated search function may find any number of candidates. Permit's consider the post-obit cases:
- No candidate found — yous can choose some other folder and try again, or locate the sample manually.
- I candidate found — Live accepts the candidate and considers the problem solved.
- Several candidates found — Live requires your help: Click the Hot-Swap button (i.e., the leftmost detail in every line of the list of missing files) to have the browser present the candidates in Hot-Bandy Mode. Yous tin now double-click the candidates in the browser to load them, as the music plays if yous like.
5.8 Collecting External Files
To prevent a Live Set from containing cleaved file references, Live provides the choice of collecting (i.eastward., copying) them into the Set's project folder. This is achieved via the File Director:
- Choose the Manage Files command from the File card
- Click the Manage Ready button
- Unfold the triangular-shaped fold button in the External Files department.
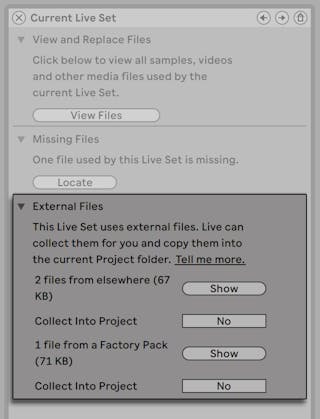
Separated by location (other Projects, the User Library, installed past factory Packs, and elsewhere — sample collections from external drives, for case), the File Manager provides:
- A file count and the associated disk infinite used;
- A Show button that will list the files in the browser;
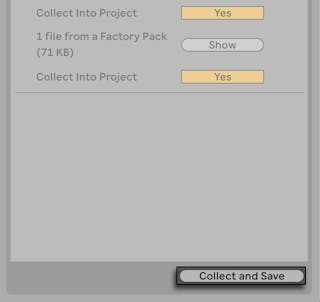
- A Yes/No toggle for engaging or disengaging collection.
Note: Brand sure to confirm your choices past clicking the File Manager's Collect and Save push button!
The File menu'due south Collect All and Relieve command is a shortcut that collects and saves all external files referenced by the electric current Set, including those from Live's Core Library or other installed Packs. Note that this tin can cause a lot of copying, peculiarly if your Alive Gear up uses large multisample collections!
v.eight.1 Collect Files on Consign
When you save Live Clips, device presets or tracks by dragging them into the Browser, Live manages the copying of associated files based on the selection made in the Collect Files on Export chooser in the Library Preferences. This chooser provides the following options:
- Always, the default setting, will re-create files into the same folder every bit the clip, preset, or rails without notification.
- When Enquire is selected, Alive provides a dialog box with options for copying files.
- Never means that files will non be copied when saving.
5.9 Aggregated Locating and Collecting
Instead of having to deal with bug while y'all are in a creative mode, you might prefer putting bated some dedicated housekeeping time to solve all the issues in one go. Using Live'due south File Manager, y'all tin can detect missing files and collect external files not only for the electric current Alive Set simply also for:
- The User Library — choose the Manage Files command from the File menu; and then click the Manage User Library button.
- The current Alive Project — choose the Manage Files command from the File menu; then click the Manage Projection push.
- Any Live Projection — right-click(Win) / CTRL-click(Mac) on a Projection in the browser's content pane, and choose the Manage Project option.
- Any choice of Alive Sets, Live Clips, Live Presets — right-click(Win) / CTRL-click(Mac) on the corresponding items in the browser, and choose the Manage Files command.
Retrieve to click the Collect and Save button at the bottom of the File Manager when you are finished. Otherwise your changes will be discarded.
5.x Finding Unused Files
Alive's File Managing director can notice the unused files in a Project for yous. Y'all can then review them and determine to delete them individually or collectively. When searching for "unused" files, Live will inspect each file in a Project folder, checking if information technology is referenced by whatever of the Live Sets, Alive Clips or device presets in the Project. If not, the file is regarded equally unused — even if other Projects or programs still use information technology.
To find the unused files for the currently open Projection, choose the Manage Files command from the File card, click the Manage Project button, and then click on the triangular-shaped fold button side by side to "Unused Files" to admission a summary and the Prove button. Clicking the Show push button makes the browser list the unused files; at that place, you tin can preview samples (encounter 5.1.4) and delete them if yous like.
Annotation y'all can also notice the unused files from the Library: choose the Manage Files command from the File menu, then click the Manage Library push, and then meet the Unused Files section.
Last but not least, you tin find the unused files for all Projects found in a specific folder (and its sub-folders): correct-click(Win) / CTRL-click(Mac) on a binder in the browser and choose the Manage Projects command, and so meet the Unused Files section. Live inspects each Project individually and labels a file unused even if some other Projects in the aforementioned folder does use that file. To preclude losses, you may desire to first collect the files into their respective Projects so purge the Projects of unused files.
v.11 Packing Projects into Packs
Live'southward File Managing director provides the option of packing a Live Project in Pack format for convenient archiving and transfer. To practice this, choose the Manage Files command from the File carte du jour, click the Manage Project push, and and then click on the triangular-shaped fold button next to "Packing." Click the Create Pack push button to bring upward a file-select dialog where you tin specify the proper noun and location of a new Pack file. Creating a new Pack from a Project does not impact the Project. If you lot want the Project deleted, you tin can delete information technology using the browser.
Live employs lossless pinch techniques to minimize the file size of Packs. Depending on the audio materials in a Projection, this saves up to fifty percentage in file size.
To unpack a Pack (i.eastward., to restore the original Live Project), double-click the Pack file (.alp), drag it into the Live main window, or locate it via the File menu'southward Install Pack command.
5.12 File Management FAQs
5.12.1 How Practice I Create a Projection?
A Project is automatically created whenever y'all save a Alive Set, except when you lot salvage information technology into a preexisting Projection.
5.12.2 How Tin I Salve Presets Into My Current Project?
You can save presets directly to the current project by dragging from the device's title bar and dropping into the Electric current Projection characterization in the browser. You lot can so use the File Direction tools, collect whatever referenced samples, etc.
5.12.3 Can I Piece of work On Multiple Versions of a Ready?
If you lot'd similar to work on different versions of the aforementioned Alive Set, salvage them into the aforementioned Projection. This volition ordinarily be the Project that was created when you saved the first version of the Alive Ready. If a Project contains multiple Live Sets it will just collect ane re-create of any samples used by the diverse versions, which can salvage disk space and assistance with organization.
5.12.4 Where Should I Save My Live Sets?
Yous can relieve Live Sets anywhere you want, but saving to pre-existing Project folders can cause bug, and should be reserved for special cases. You lot should but save a Alive Ready to an existing Project if information technology is somehow related to the Project — for example, an alternate version of a song that'due south already in the Project.
5.12.5 Can I Use My Own Folder Structure Within a Project Folder?
You lot tin can organize your files any fashion you want inside a Project, but yous'll need to use the File Managing director to relink the files that you've moved around:
- In Live's Browser or via your operating system, reorganize the files and folders within your Project folder.
- Navigate to the Projection binder in the Browser and choose Manage Project via the right-click(Win) / CTRL-click(Mac) context menu.
- If y'all've inverse the original location of any samples used in the Projection, the Missing Samples department of the File Managing director will point this. Click the Locate button to search for the samples.
- Since yous know that your samples are all in the Project binder, unfold Automated Search. So enable the Search Project and Fully Rescan Folders options. Finally, click Become to initiate the search.
- When searching is complete, click Collect and Save at the bottom of the File Managing director to update the Project.
Source: https://www.ableton.com/en/manual/managing-files-and-sets/
0 Response to "How to Preview Midi Midi Review on Mac"
ارسال یک نظر