Weve Encountered a Problem. Please Try Again in a Few Minutes.ã¯â€¦å¡
Contact forms tin be useful way for visitors to contact the owner of a site. They're easy to use, and since they don't expose the site owner's email accost in the page, they cut down on spam as well.
However, contact forms can likewise be cumbersome, specially every bit they're usually on a dissever page. The visitor has to visit the contact course folio, fill up in the details, view yet another response page, and then try to make their way back to the page they were originally reading.
Fortunately, Ajax gives united states a fashion round this problem. Past embedding the class in the folio, and submitting the grade data via Ajax, the user never has to leave the current page. Information technology also provides a smoother experience for the user.
In this tutorial we'll build a nice-looking, embedded Ajax contact form that the user can summon upward past clicking a link in the page. Along the way, we'll explore various topics, including:
- HTML5 course fields
- How to use fallback techniques to brand the form function fifty-fifty if the browser has JavaScript turned off
- Using CSS techniques to create attractive forms
- Writing a secure form mailer using PHP
- Animating page elements with jQuery, and, of class…
- Using jQuery to brand Ajax requests
Before you brainstorm, check out the finished product by clicking the View Demo button above. This opens a new page with some dummy content, and a couple of "Send united states of america an email" links. Click i of these links to display the grade.
The demo doesn't actually send an email anywhere, but the finished code in the download is fully functional. To get the code, click the Download Lawmaking button above.
Prepare? Permit's become started!
Step 1: Create the markup
Allow's start with the HTML for our page. This includes the form itself — nosotros'll hide it initially using JavaScript when the page loads — and also some dummy content and a couple of "Transport us an e-mail" links that will brandish the grade when clicked:
<!doctype html> <html lang="en"> <head> <title>A Slick Ajax Contact Form with jQuery and PHP</title> <meta http-equiv="Content-Type" content="text/html;charset=utf-8"> </head> <body> <div id="content"> <p style="padding-lesser: 50px; font-weight: bold; text-marshal: center;"><a href="#contactForm">~ Send us an electronic mail ~</a></p> <!-- Content here --> <p style="padding-meridian: 50px; font-weight: bold; text-align: center;"><a href="#contactForm">~ Transport us an email ~</a></p> </div> <form id="contactForm" activity="processForm.php" method="mail"> <h2>Send us an email...</h2> <ul> <li> <label for="senderName">Your Name</characterization> <input blazon="text" name="senderName" id="senderName" placeholder="Please blazon your name" required="required" maxlength="xl" /> </li> <li> <label for="senderEmail">Your Email Address</label> <input blazon="email" name="senderEmail" id="senderEmail" placeholder="Please blazon your email address" required="required" maxlength="l" /> </li> <li> <characterization for="bulletin" way="padding-height: .5em;">Your Message</label> <textarea name="message" id="bulletin" placeholder="Please blazon your bulletin" required="required" cols="80" rows="ten" maxlength="10000"></textarea> </li> </ul> <div id="formButtons"> <input type="submit" id="sendMessage" name="sendMessage" value="Send Electronic mail" /> <input type="button" id="abolish" name="cancel" value="Cancel" /> </div> </form> <div id="sendingMessage" class="statusMessage"><p>Sending your bulletin. Delight look...</p></div> <div id="successMessage" class="statusMessage"><p>Thanks for sending your bulletin! We'll get back to you soon.</p></div> <div id="failureMessage" class="statusMessage"><p>There was a trouble sending your message. Please try once more.</p></div> <div id="incompleteMessage" class="statusMessage"><p>Please complete all the fields in the form before sending.</p></div> </torso> </html>
I've omitted the dummy content in the in a higher place code, since it'southward not relevant to the tutorial.
The form sends its information to a processForm.php script that does the actual emailing. (We'll write this PHP script in a moment.) By setting the course's activity aspect to "processForm.php", nosotros ensure that the form is usable even with JavaScript disabled. Later on, our JavaScript will read this action attribute so that information technology knows where to send the Ajax request.
The form itself uses some HTML5 form features such as placeholders, the email field type, and the required attribute to ensure that all the fields have been filled in. We'll besides add JavaScript validation for browsers that don't even so back up HTML5 validation.
Step 2: Add the CSS
Now we'll add the CSS to our HTML page in order to fashion the page and form. The bulk of the CSS positions the grade and condition messages in the heart of the window, and styles the grade and form fields.
<style blazon="text/css"> /* Add some margin to the page and gear up a default font and color */ body { margin: 30px; font-family: "Georgia", serif; line-height: ane.8em; colour: #333; } /* Set the content dimensions */ #content { width: 800px; padding: 50px; margin: 0 auto; display: block; font-size: ane.2em; } #content h2 { line-superlative: 1.5em; } /* Add together curved borders to various elements */ #contactForm, .statusMessage, input[type="submit"], input[type="button"] { -moz-edge-radius: 10px; -webkit-border-radius: 10px; border-radius: 10px; } /* Manner for the contact course and status messages */ #contactForm, .statusMessage { color: #666; background-color: #ebedf2; background: -webkit-gradient( linear, left bottom, left summit, color-end(0,#dfe1e5), colour-end(1, #ebedf2) ); groundwork: -moz-linear-gradient( center bottom, #dfe1e5 0%, #ebedf2 100% ); edge: 1px solid #aaa; -moz-box-shadow: 0 0 1em rgba(0, 0, 0, .five); -webkit-box-shadow: 0 0 1em rgba(0, 0, 0, .5); box-shadow: 0 0 1em rgba(0, 0, 0, .5); opacity: .95; } /* The form dimensions */ #contactForm { width: 40em; summit: 33em; padding: 0 ane.5em 1.5em 1.5em; margin: 0 auto; } /* Position the form in the eye of the window (if JavaScript is enabled) */ #contactForm.positioned { position: stock-still; acme: 0; bottom: 0; left: 0; correct: 0; margin-height: auto; margin-lesser: machine; } /* Dimensions and position of the condition messages */ .statusMessage { display: none; margin: car; width: 30em; height: 2em; padding: 1.5em; position: fixed; top: 0; lesser: 0; left: 0; right: 0; } .statusMessage p { text-marshal: middle; margin: 0; padding: 0; } /* The header at the height of the form */ #contactForm h2 { font-size: 2em; font-style: italic; letter-spacing: .05em; margin: 0 0 1em -.75em; padding: 1em; width: 19.5em; colour: #aeb6aa; groundwork: #dfe0e5 url('images/stamp.jpg') no-repeat 15em -3em; /* http://morguefile.com/archive/brandish/606433 */ border-bottom: 1px solid #aaa; -moz-border-radius: 10px 10px 0 0; -webkit-edge-radius: 10px 10px 0 0; edge-radius: 10px 10px 0 0; } /* Requite form elements consistent margin, padding and line height */ #contactForm ul { list-way: none; margin: 0; padding: 0; } #contactForm ul li { margin: .9em 0 0 0; padding: 0; } #contactForm input, #contactForm label { line-pinnacle: 1em; } /* The field labels */ label { display: block; float: left; clear: left; text-marshal: right; width: 28%; padding: .4em 0 0 0; margin: .15em .5em 0 0; font-weight: assuming; } /* The fields */ input, textarea { display: block; margin: 0; padding: .4em; width: 67%; font-family: "Georgia", serif; font-size: 1em; border: 1px solid #aaa; -moz-edge-radius: 5px; -webkit-border-radius: 5px; border-radius: 5px; -moz-box-shadow: rgba(0,0,0,.2) 0 1px 4px inset; -webkit-box-shadow: rgba(0,0,0,.2) 0 1px 4px inset; box-shadow: rgba(0,0,0,.2) 0 1px 4px inset; background: #fff; } textarea { height: 13em; line-height: one.5em; resize: none; } /* Place a edge effectually focused fields, and hide the inner shadow */ #contactForm *:focus { edge: 1px solid #66f; outline: none; box-shadow: none; -moz-box-shadow: none; -webkit-box-shadow: none; } /* Brandish correctly filled-in fields with a green background */ input:valid, textarea:valid { background: #dfd; } /* The Send and Cancel buttons */ input[type="submit"], input[blazon="button"] { float: right; margin: 2em 1em 0 1em; width: 10em; padding: .5em; border: 1px solid #666; -moz-border-radius: 10px; -webkit-edge-radius: 10px; border-radius: 10px; -moz-box-shadow: 0 0 .5em rgba(0, 0, 0, .8); -webkit-box-shadow: 0 0 .5em rgba(0, 0, 0, .8); box-shadow: 0 0 .5em rgba(0, 0, 0, .8); color: #fff; groundwork: #0a0; font-size: 1em; line-height: 1em; font-weight: bold; opacity: .7; -webkit-appearance: none; -moz-transition: opacity .5s; -webkit-transition: opacity .5s; -o-transition: opacity .5s; transition: opacity .5s; } input[type="submit"]:hover, input[blazon="submit"]:active, input[type="push button"]:hover, input[type="button"]:active { cursor: pointer; opacity: 1; } input[type="submit"]:active, input[type="button"]:active { color: #333; background: #eee; -moz-box-shadow: 0 0 .5em rgba(0, 0, 0, .8) inset; -webkit-box-shadow: 0 0 .5em rgba(0, 0, 0, .8) inset; box-shadow: 0 0 .5em rgba(0, 0, 0, .8) inset; } input[blazon="button"] { background: #f33; } /* Header/footer boxes */ .wideBox { clear: both; text-align: center; margin: 70px; padding: 10px; background: #ebedf2; edge: 1px solid #333; } .wideBox h1 { font-weight: bold; margin: 20px; color: #666; font-size: i.5em; } </mode> <!-- Some IE7 hacks and workarounds --> <!--[if lt IE viii]> <style> /* IE7 needs the fields to exist floated also as the labels */ input, textarea { float: correct; } #formButtons { clear: both; } /* IE7 needs an ickier approach to vertical/horizontal centring with stock-still positioning. The negative margins are half the chemical element's width/height. */ #contactForm.positioned, .statusMessage { left: fifty%; peak: 50%; } #contactForm.positioned { margin-left: -20em; margin-top: -xvi.5em; } .statusMessage { margin-left: -15em; margin-top: -1em; } </mode> <![endif]--> Let'southward expect at some interesting sections of the CSS:
- Style for the contact grade and condition letters
We give the form and status boxes a overnice gentle meridian-to-bottom gradient using-webkit-gradientand-moz-linear-gradient, and we besides add a drib shadow withbox-shadow(and its vendor-specific variants). Finally, we requite the class and message boxes an opacity of .95 (95%), which makes the page content only testify through — a nice subtle consequence. - Position the form in the middle of the window (if JavaScript is enabled)
Initially, nosotros simply place the form inline subsequently the page content. This is so that the class can be used for non-JavaScript-enabled browsers without getting in the way of the content. All the same, for JavaScript browsers, we desire the class to announced in the center of the window, over the top of the content.Our
#contactForm.positioneddominion does just that. It uses fixed positioning, sets thetop,bottom,leftandrightvalues all to zero, and ensures that all 4 margins are fix toauto. This centres the element both horizontally and vertically in most modern browsers. Later nosotros'll use our JavaScript to add thepositionedclass to the grade.We also position the status message boxes in the same fashion.
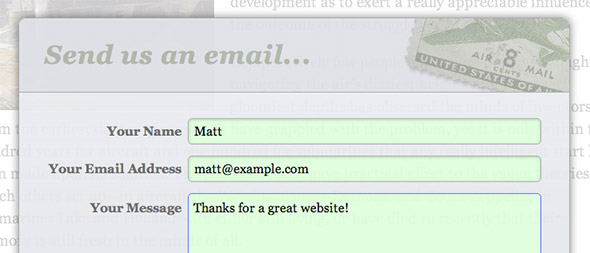
- The header at the top of the grade
Our form includes a nice "Ship us an email…" header with an image of a stamp stamp. Our#contactForm h2dominion styles this header. We give the text a large italic style and space the messages out slightly. We also add together margin and padding to create space around and within the header. Nosotros use some negative left margin (-.75em) on the header to bypass the padding on the form, so that the header goes right to the left edge of the form. We also set the width of the header to 19.5em so that it exactly matches the width of the course.Why -.75em and 19.5em? Because european monetary system cascade, and we've set our font size to 2em. So -.75em actually becomes -1.5em (the width of the form's padding), and 19.5em becomes 39em (the width of the course, minus 1em for the
h2's padding). Phew! Maybe I'll utilise pixels next time… 🙂We also set the heading's colour, give it a night background, position the postage stamp postage stamp paradigm in the top right corner, add a sparse bottom border, and add curved top corners.
- The fields
Nosotros give theinputandtextareafields an attractive font, a rounded border usingedge-radius, and a gentle inner shadow usingbox-shadow. We also float the field labels left so that they sit alongside the fields. When a field is focused (clicked on or moved to with the Tab cardinal), we give information technology a blue border and remove the shadow. We besides prepareoutline: noneto remove the blue outline added past some browsers. Finally, we use the:validpseudo-form to give correctly completed fields a green groundwork, for those browsers that support HTML5 course validation. - The Send and Cancel buttons
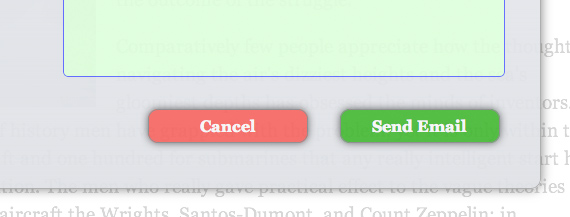
input[type="submit"]selects the Transport Email button, whileinput[type="button"]selects the Cancel push. We bladder them right to position them side by side, and add some margin to give them space. We give them a fixed width, and some padding to make them a decent size. We add together a rounded border and subtle drop shadow, and specify text and background colours. We besides make the buttons slightly transparent (opacity: .seven), and make them fully transparent when hovered over to highlight them. We use a CSS transition to fade the opacity slowly. Finally, when the buttons are clicked (:active) we move the shadow within the buttons to give a "pressed" appearance, and give them a blackness-on-white colour scheme.
Step three: Build the PHP grade mailer
Nosotros've now created our form page, and styled the grade. The side by side step is to build a short PHP script to actually ship the e-mail letters. This script will reside on the web server. When the user submits the form, the form'southward information is sent to the PHP script, which then sends the email and returns a response indicating whether or not the electronic mail was sent successfully.
Here's the PHP script — telephone call it processForm.php, and save it in the aforementioned folder equally the grade page you created in Steps 1 and 2:
<?php // Define some constants define( "RECIPIENT_NAME", "John Smith" ); define( "RECIPIENT_EMAIL", "john@instance.com" ); define( "EMAIL_SUBJECT", "Visitor Message" ); // Read the form values $success = false; $senderName = isset( $_POST['senderName'] ) ? preg_replace( "/[^.-' a-zA-Z0-9]/", "", $_POST['senderName'] ) : ""; $senderEmail = isset( $_POST['senderEmail'] ) ? preg_replace( "/[^.-_@a-zA-Z0-nine]/", "", $_POST['senderEmail'] ) : ""; $bulletin = isset( $_POST['message'] ) ? preg_replace( "/(From:|To:|BCC:|CC:|Subject:|Content-Type:)/", "", $_POST['message'] ) : ""; // If all values exist, send the email if ( $senderName && $senderEmail && $bulletin ) { $recipient = RECIPIENT_NAME . " <" . RECIPIENT_EMAIL . ">"; $headers = "From: " . $senderName . " <" . $senderEmail . ">"; $success = mail( $recipient, EMAIL_SUBJECT, $bulletin, $headers ); } // Return an advisable response to the browser if ( isset($_GET["ajax"]) ) { echo $success ? "success" : "error"; } else { ?> <html> <head> <title>Thanks!</title> </head> <body> <?php if ( $success ) echo "<p>Thank you for sending your bulletin! Nosotros'll get back to yous presently.</p>" ?> <?php if ( !$success ) repeat "<p>At that place was a problem sending your bulletin. Please endeavour again.</p>" ?> <p>Click your browser'due south Dorsum button to return to the page.</p> </body> </html> <?php } ?> This script is adequately straightforward. Allow'southward suspension it down:
-
- Ascertain some constants
First we define some config options for the name and e-mail address of the person who will receive the email message. (Change these to your own name and email address.) We also set a subject for the bulletin. - Read the form values
Next nosotros check for our 3 class fields,senderName,senderEmailandmessage, in the posted form data. For each field, we check if it exists. If it does then we pass its value through a regular expression to remove any potentially malicious characters that a spammer might try to use, and store the outcome in a variable. If information technology doesn't be then we set the variable to an empty value. - If all values exist, send the electronic mail
If the three field values all contain information then we transport the electronic mail. First we construct the recipient string from the recipient name and email address. Then we add a"From:"header to the message using the name and email address that the company entered in the form. This is the "From:" value that the recipient will see in their email program. Finally, we use the PHPmail()part to transport the email message, storing the return value in the variable$success. (mail()returnstrueif it managed to send the email, orfalseotherwise.) - Return an appropriate response to the browser
Once nosotros've attempted to send the electronic mail, we ship a "success" or "fault" message dorsum to the browser as appropriate. If the request URL contained an"ajax"parameter and so we know the form was submitted via Ajax using our JavaScript code, then we just return the value"success"or"error"to the JavaScript, which volition then display an appropriate message to the user. Still, if the grade was submitted without using Ajax and then the user must have JavaScript turned off in their browser. In this state of affairs, we brandish a more helpful fault message in the browser, with instructions to the user to use their Back push button to render to the page.Our JavaScript will add the
ajaxparameter to the URL when it submits the form, as y'all'll see in Footstep six.
- Ascertain some constants
Stride iv: Include the jQuery library and set the delay
Our class is actually functional now. You can open the folio in a browser, click the "Transport us an email" link to jump to the form, fill in the fields, and submit the grade to send the message.
However, we're now going to enhance our form using JavaScript to make the feel nicer for the user.
Nosotros'll use jQuery to do most of the heavy lifting, and then the starting time step is to include the jQuery library in the page's caput element:
<script type="text/javascript" src="http://ajax.googleapis.com/ajax/libs/jquery/one.five.1/jquery.min.js"></script>
Here we've linked directly to the jQuery library on Google's CDN, but you can download the library and host it on your own server if you prefer.
We'll also add a global config variable, messageDelay, to command how long the message boxes appear on the screen. This value is in milliseconds. Feel free to change it to a shorter or longer time:
<script type="text/javascript"> var messageDelay = 2000; // How long to display status messages (in milliseconds)
Step v: Write the init() function
The start phase of our form-enhancing JavaScript is the init() function. This sets up the form so that information technology can exist shown and hidden on demand, and also modifies the course then that it will be submitted using our JavaScript, rather than sent natively by the browser.
Here'due south the code:
// Init the form once the document is ready $( init ); // Initialize the class role init() { // Hide the form initially. // Make submitForm() the grade's submit handler. // Position the form then it sits in the centre of the browser window. $('#contactForm').hide().submit( submitForm ).addClass( 'positioned' ); // When the "Send united states of america an email" link is clicked: // ane. Fade the content out // ii. Display the form // 3. Movement focus to the first field // four. Foreclose the link being followed $('a[href="#contactForm"]').click( office() { $('#content').fadeTo( 'ho-hum', .two ); $('#contactForm').fadeIn( 'wearisome', function() { $('#senderName').focus(); } ) render false; } ); // When the "Cancel" button is clicked, close the form $('#cancel').click( function() { $('#contactForm').fadeOut(); $('#content').fadeTo( 'slow', 1 ); } ); // When the "Escape" key is pressed, shut the course $('#contactForm').keydown( function( event ) { if ( event.which == 27 ) { $('#contactForm').fadeOut(); $('#content').fadeTo( 'boring', 1 ); } } ); } Let'due south look at each clamper of the above lawmaking:
-
-
-
- Init the grade once the certificate is ready
We employ the jQuery object,$, to trigger ourinit()office once the DOM is prepare. - Hibernate the form, set the submit handler, and position the form
The first matter we do inside theinit()function itself is brand some changes to our course,#contactForm.First we hide it from the folio using the jQuery
hibernate()method. Then we set itssubmitevent handler to oursubmitForm()function (which we'll write in a moment). This ensures that, when the user submits the form,submitForm()is called instead of the native browser course submission kick in. Finally, we add thepositionedCSS course to the form to reposition it in the centre of the browser window. - Brand the "Send us an email" links open up the form
Next we demark an anonymous effect handler office to the "Send us an electronic mail" links'clickevents. This office fades out the page content so it'south but just visible in the groundwork; fades the contact course in; and sets the focus on the "Your Name" field, ready for the user to outset filling in the grade. Finally, the function returnsfalseto forbid the links from beingness followed. - When the "Abolish" push button is clicked, close the form
Now we bind some other anonymous function to the "Cancel" button'sclickevent, and so that the user can shut the form by clicking the push button. The function merely fades the grade out, and fades the page content dorsum in. - When the "Escape" central is pressed, close the form
Similarly we bind a function to the contact course'skeydownoutcome, so that we can read any key the user presses when they're viewing the form. In this function, nosotros check if the user has pressed the "Escape" central (character code: 27). If they accept then we close the form by fading it out, and fading the content in.
- Init the grade once the certificate is ready
-
-
Step half-dozen: Write the submitForm() function
Nosotros've at present fix our grade then that, rather than being submitted in the usual style, it will trigger the submitForm() function when the user submits it. This function needs to practise some validation and, if all is well, submit the form data to the PHP script via Ajax.
Here's the part in total:
// Submit the form via Ajax part submitForm() { var contactForm = $(this); // Are all the fields filled in? if ( !$('#senderName').val() || !$('#senderEmail').val() || !$('#bulletin').val() ) { // No; display a warning bulletin and render to the form $('#incompleteMessage').fadeIn().delay(messageDelay).fadeOut(); contactForm.fadeOut().delay(messageDelay).fadeIn(); } else { // Aye; submit the class to the PHP script via Ajax $('#sendingMessage').fadeIn(); contactForm.fadeOut(); $.ajax( { url: contactForm.attr( 'action' ) + "?ajax=true", blazon: contactForm.attr( 'method' ), information: contactForm.serialize(), success: submitFinished } ); } // Prevent the default form submission occurring render fake; } Here'due south how the part works:
-
-
-
- Store the contact form in a variable
Since nosotros'll be using it a lot throughout the function, we offset off by storing the contact form element in acontactFormvariable. This element is bachelor to our role as thethisvariable, since the function is the event handler for the chemical element'southsubmitupshot. We wrap the element in a jQuery object to make it easier to work with. - Bank check all the fields are filled in
At present nosotros check that each field's value is non empty by using the jQueryval()method on each field. - Display a warning if the form isn't completed
If 1 or more of the fields are empty, we fade out the form, then fade in the#incompleteMessagediv, which contains the "Please consummate all the fields…" bulletin. We continue the message there for the fourth dimension specified past themessageDelayvariable, then fade information technology out again. In one case information technology's faded out, nosotros fade the class dorsum in so that the user can consummate it. - Submit the course if it is completed
Now we get to the meat of the JavaScript. If the form is completed then we first fade out the class, and fade in the "Sending your message…" box. Now we call the jQueryajax()method to submit the grade via Ajax to the PHP script. We laissez passer the following arguments to the method:-
url - The URL to send the grade to. Nosotros grab this from the form's
actionattribute, and append anajax=truthfulparameter to the query cord and then that our PHP script knows the grade was sent via Ajax, rather than via the usual method. -
type - The type of request to make (
"Mail service"or"Get"). We grab this from the form'due southmethodattribute, which in this case is fix to"POST". -
data - The data to send with the request. For this, we call the jQuery
serialize()method on the contact form object. This method takes all the field names and values in the form and encodes the data in a query cord. We then pass this cord to theajax()method and then it can send the information to the PHP script. -
success - This is a callback part that volition exist called once the Ajax request has finished and the browser has received the response from the server. We ready this to our
submitFinished()function, which we'll write in a moment.
-
- Prevent the default course submission occurring
Finally, our event handler returnsfalseto foreclose the form being submitted in the usual way.
- Store the contact form in a variable
-
-
Stride 7: Write the submitFinished() function
The last function we need to write is submitFinished(), which is called once the Ajax response from the PHP script has been received by the browser. This function needs to check the response and display a success or mistake bulletin as appropriate:
// Handle the Ajax response function submitFinished( response ) { response = $.trim( response ); $('#sendingMessage').fadeOut(); if ( response == "success" ) { // Form submitted successfully: // 1. Brandish the success bulletin // 2. Clear the form fields // three. Fade the content dorsum in $('#successMessage').fadeIn().delay(messageDelay).fadeOut(); $('#senderName').val( "" ); $('#senderEmail').val( "" ); $('#message').val( "" ); $('#content').delay(messageDelay+500).fadeTo( 'deadening', ane ); } else { // Form submission failed: Display the failure message, // and so redisplay the form $('#failureMessage').fadeIn().delay(messageDelay).fadeOut(); $('#contactForm').delay(messageDelay+500).fadeIn(); } } </script> The function works as follows:
-
-
-
- Become the response
jQuery passes the response from the PHP script every bit an argument to thesubmitFinished()role. We take this string and pass it through the jQuerytrim()method to remove any whitespace. - Fade out the "sending" message
Side by side nosotros fade out the "Sending your bulletin…" box by calling the jQueryfadeOut()method. - If email was sent successfully, display a success bulletin
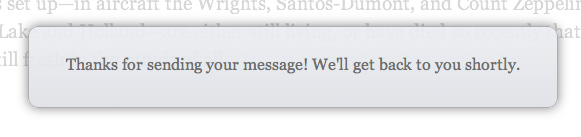
If theresponsevariable holds the cord"success", as returned by our PHP script, then nosotros know that the email was successfully queued for commitment. Then we fade in the success message, hold it for a couple of seconds, then fade it out. Nosotros as well reset the form fields to empty values, in case the user wants to send another message. Finally, one time the success message has faded out, we fade the page content back in. - If there was a problem, brandish a failure bulletin
If the PHP script returned anything other than"success"then we know at that place was a trouble with the submission, so we display the failure bulletin stored in the#failureMessagediv, so fade the form dorsum in so that the user can correct whatsoever problems with the form.
- Become the response
-
-
And that's the end of our JavaScript!
Summary
Nosotros've at present built our slick Ajax contact form. Non only does it look good, just it'south easy to use, and the visitor can send an email without ever having to leave the page they are reading. Nice!
Here's the demo over again:
I promise you enjoyed following this tutorial. Feel free to apply the code in your own projects if you similar. Equally always, if you have any comments, suggestions or questions on the tutorial, delight practise post them in the responses below.
Accept fun!
Source: https://www.elated.com/slick-ajax-contact-form-jquery-php/
0 Response to "Weve Encountered a Problem. Please Try Again in a Few Minutes.ã¯â€¦å¡"
ارسال یک نظر